Showing posts with label Tutorial. Show all posts

Friday, June 20, 2014

Quick Tip: Easy Beachy Hair!

Photo by Molly Stronczek
Almost everyone loves those "fresh from the ocean" waves, but what if you're don't happen to be coastal? Of course, you can go out and buy "beachy hair" spray, but why waste all of that summer sunshine shopping when you probably have everything you need to make a great wave spray within reach.

"Beachy Hair" Wave Spray Recipe

Ingredients:
spray bottle
spray detangler (or your favorite rinse-out conditioner)
1-2 tsp. sea or Epsom salt
warm water

How-to:
Fill an empty spray bottle halfway with almost-hot water, then add your favorite spray detangler; make sure you leave enough room so that you can add the salt and screw your top on without overflowing. Next, add salt- if you have fine hair, start with just one teaspoon and add salt in 1/4 tsp increments until you get the results you like, otherwise go ahead and add 2 full teaspoons.

If you don't have spray de-tangler laying around the house, fill your spray bottle with warm water, add the salt and then add about a nickel-sized dollop of your regular rinse-out conditioner (I use that amount with about 8oz of water. If you have very fine hair or are using a smaller spray bottle, use a bit less. Thick, dry or coarse hair, or a bigger bottle? Add a little more). Then, shake-shake-shake to blend.

That's it. I usually use my salt spray on damp or dry hair and "scrunch" to enhance the curl. I've bought plenty of wave spray in my day, but always blend my own now, because I can control the formula better (more or less conditioner, more salt for more curl- but crunchier- a little gel for hold, etc...) Enjoy!

Monday, April 30, 2012

Quick Tip: How to Clean False Lashes

If you've ever found yourself wondering what I sound like, today's your lucky day- I made a video! You can thank my sister for this: she texted asking how to clean her false lashes, and it just proved to be much easier to shoot a quick video than try to put it all in writing. So, not rocket science, but...enjoy!

Wednesday, April 25, 2012

Eye of the Day:
Weeping Cherry Blossom


This is one of my very favorite looks for spring nights out; the vibrancy of the pink is a nice change after all of those deep, dark winter hues, but at the same time, the matte finish, bold liner and semi-cut crease really step up the drama. Not into pink? Use any other light-bright shade to customize it!

First, use a skin-toned primer on your lid from lash to brow- today I used Urban Decay Potion Primer. Next, using a short, dense paddle brush (MAC 239) brush a mid-tone bright matte pink shadow (Kryolan Flamingo) along the entire lash line, blending up and out to just above your natural crease.

Next, line your eye with your favorite liquid liner (I used Lanome Artliner in Noir). Lining before you contour your crease is essential- the wing has to end at the natural crease of the eye- trust me, it makes it look! To determine the correct angle, imagine making a line from the outer corner of your eye to where it would meet the end of your eye brow.

After lining, load a small smudger brush (my beloved, Lancome #10, has been discontinued) with a deep, matte eggplant shade (MUFE 160). Starting at the outside corner of your eye, where you ended your liner "wing", use light sketching strokes and follow the underside of your brow bone in, stopping at about the center of your lid (above the pupil). A lot of tutorials show this step with a pencil brush like MAC's 219, but unless your lid space is huge, I think a small smudger is lots easier to work with here.

After you've got your crease "cut" you can lightly begin blending your eggplant line up in the outer 1/3rd of your eye, working toward the brow. I stick with the smudger brush for most of this process, wiping excess shadow off before I start to blend.

When I'm relatively comfortable with the fade of the plum shade, I do turn to my pencil brush; using it clean at first. Use a windshield wiper motion to blend the deep crease color into the skin below the brow bone. Next, add just a tiny amount of your matte pink (the same shade you used on the lid) and blend over the top edge of where your plum has faded out. Make sure you're working on top of the eggplant shadow- if you put the pink on bare skin you won't get the subtle gradient we're looking for. Since I don't have a lot of space between my lid and brow bone, I like to leave some space to make the area look larger, so I stop shy of taking the pink up to the brow.

Next, go back to your small smudge brush & pick up a little bit of matte black shadow (I used the one from my Sleek Acid Palette). With a light hand, work the black in the corner V to give some depth to the look. At this point, I lined my water line (all the way) and lash line (just the outer half, tapering off at the pupil) with Makeup For Ever Aqua Eyes pencil in matte black, and smudged over that with the black shadow left over on my brush.

Of course, you could stop here and you'd have a very eye-catching cut-crease look, but I wanted something just a touch softer. Grab your pencil brush once more and place it, without applying additional color, in the crease just inside where your liquid liner meets the crease color. Keeping it in place, move the brush in small circular motions. You're basically using the motion of the brush to bring a little of the black and eggplant into the outer corner of the eye. If you need to, you can add the tiniest amount of eggplant to your pencil brush, but keep it super light- you don't want to blend away the defined crease.

To finish, add a bit of white shimmer to the inside tear-ducts and under the eye brows, blending into the pink slightly. Top it off with mascara and you're done!

Tuesday, December 6, 2011

Eye of the Day: Mulled Cranberry Cider


It's been a long time since I've done an EOTD...honestly, it's been a long time since I've done anything fancy makeup-wise at all (on myself anyway!) Having a VERY active almost-four-year-old takes makeup down a few notches on the priority list, and the fact that my camera is crap and I can pretty much never get pictures that decently portray my work doesn't help. Really, my blood pressure is high as it is, so spending the time to create a look and then not being able to get a photo that shows accurate color, depth and texture (sometimes I'd even settle for 2 out of 3) is sometime more trouble than I can bare. But enough whining!

The other day I was talking to the lovely Mika of aijuswhanakno, about a particular brand that I have no great love for, Urban Decay. Mika mentioned that she was a little jealous that I had the first Book of Shadows and didn't even like it. This got me to thinking, maybe I need to get it out and give it another try. That's where this look came from.

I wanted to do something seasonal, but not totally expected, and I also wanted to work strictly within the palette. I decided if I was going to give Urban Decay some love, I was going to go in full force: the first shade I dipped into was glitter-bomb extraordinaire, Midnight Cowboy.

After applying NYX White Eyeshadow Base (not my favorite, but it was the closest at hand) I used my MAC 239 to dab Midnight Cowboy on the inner corner of my eye, not quite 1/3 of the way toward the center.

Again with my 239, I took Baked and put it on the rest of my lid, blending it lightly into the Midnight Cowboy by tapping gently with my finger. I took the Baked out to the outer corner of my eye, and blended it just up to the crease.

With a MAC 219 I added Roach, concentrating the color toward the outer corner and crease and lightly pulling it in toward the midpoint of my lid.

Above my crease, I used a MAC 217 brush to blend Last Call into and slightly above where I'd placed the roach, stopping just on top of my orbital bone.

When it came to blending and hi-lighting my brow bone, I ran out of luck with my Book of Shadows. Of the 16 shades in the book, not one was light enough or matte enough to use as a blending shade, so I grabbed my Sleek Au Naturel palette and used my MAC 217 with Honeycomb to soften the top edge of the Last Call. I added a bit of Nougat under the high point of my brow and blended it outer end of my brow. As a last though, I took a little bit of baked in the inner 1/3 of my crease to add some interest and soften the transition from the berry-plum Last call and the fair champagne of the Midnight Cowboy (you can see this touch better in the picture below, it's not as apparent in the pic above).

I applied UD 24/7 Glide-On Eye Pencil in Rockstar on the top lash line from the outer corner inward to just about the pupil, and just about to the outer 1/4 of my bottom lash line. Using a smudger brush I softened the top line and pulled the bottom line in to about the mid-point of my eye. Then I used the same brush to apply a bit of Last Call on top of the liner. I cleaned my brush, applied 24/7 pencil in Eldorado to my lower waterline and the very inner corner of my eyes, and used my smudger to add a bit of baked to the inner corners and inner, lower lash line, blending the gold shade into Last Call.

I added some Make Up For Ever Smoky Lash in black, and called it a day!


You'll have to forgive me for the pictures- the lighting is awful, and the cropping and wonky angles are even worse, but these were the shots that I felt best captured the colors and placement. Hauling my Book of Shadows out of the depths one more time was a nice challenge- though that Midnight Cowboy almost made me regret my decision from the get go. One thing you can see in the pictures are some of the tiny white flecks that show the migration path Cowboy's silver glitter moseys along on. Keep in mind, this was after constant dusting and sponging to remove the glitter from beneath my eyes. Finally, I grabbed my makeup wipes and wiped away the glitter- 3 or 4 times! I re-did my foundation, but still, by the time I was ready to take pictures, the only place this glitter wasn't was on the part of my lid where I'd actually put it. Grrr....

As I mentioned, there also isn't a great hi-lighting option in this set for fair skin. There's also a lack of contouring shades, being that even the deeper shades like Roach are satiny and reflect light- making it really hard to get good depth out of them. The one good, dark contour in this palette is Perversion, but to my eye this "jet black" leans a little blue, so I skipped it this time lest I muddy up my look.

Product List:
  • NYX White Eyeshadow Base (I prefer Urban Decay Primer Potion)
  • UD Midnight Cowboy (pale champagne with chunky silver glitter)
  • UD Baked (an almost-bronze gold)
  • UD Roach (satiny deep copper brown)
  • UD Last Call (mid-tone satin plum-berry)
  • Sleek MakeUP Honeycomb (matte light wheat)
  • Sleek MakeUP Nougat (matte off-white) 
  • UD's 24/7 Glide-On Eye Pencil in Rockstar (charred eggplant)
  • UD's 24/7 Glide-On Eye Pencil in Eldorado (gold)
  • Make Up For Ever Smoky Lash mascara in Black.
Brushes:
  • MAC 239 (small dense, short-bristled paddle brush)
  • MAC 219 (pencil brush)
  • MAC 217 brush (full, fluffy, round-tipped brush)
  • Lancome #10 Smudger Brush
The Sleek product featured in this review was submitted for promotional consideration by a representative of the company. 


Tuesday, November 2, 2010

Calaveras de Azúcar

For those of you who aren't familiar, Dia de Los Muertos (which translates to day of the dead) is a Mexican holiday to honors, remember and celebrate those who have passed on. The holiday is marked by festive eating and drinking, sometimes on the grave site of the dead, where colorful altars are set up with favorite foods and drinks of the departed loved ones. Among the common decorations are calaveras de azúcar (Sugar Skulls).

In commemoration of the holiday, which is celebrated on November 1st and 2nd (to coincide with the Catholic holidays All Saints' Day and All Souls' Day) I thought I'd share with you my Halloween costume from this year: my very own pout painted up like a super sweet sugar skull!

This was my first crack at a calavera de azúcar, but luckily for me, they come as basic or as detailed as you'd like, so I had a wide range to work from. I started out by applying Ben Nye Cream Foundation in P-1 White over my entire face using an ELF studio powder brush. Next, I applied a fine white opalescent glitter all over (I'll be washing that out of my hair until next year!) I used a good craft store glitter; unfortunately, you really can't see it in the picture, but trust me- it's there. This gave a nice effect that was reminiscent of actual sugar, though were I to do this again, I'd spray a sealer over the white cream before applying the glitter. I didn't this time and I found that the cream makeup somewhat coated the glitter and reduced its shimmer.

Next, to make my face appear more skeletal, I used a MAC 109 brush and NYX Black eyeshadow to carve out the hollow under my cheek, angling the line down along my chin and then blending it out toward my neck. An inverted heart painted on with MAC Blackground Paint Pot mimics the nasal cavity of the skull.

For my lips, I chose a red lip liner (Ben Nye in Plum LP-24 which, despite its name, is a cherry red shade) and traced a small, heart shaped lip inside my natural lip line, slightly exaggerating the line up over my Cupid's bow. Once I was happy with the shape, I filled in with MAC Lady Danger lipstick and a tiny bit of OCC Lip Tar in NSFW. For the stitches/skeleton teeth effect, I used Lancome Artliner in Noir.

The first step for my eyes was a good primer- I used Urban Decay Primer Potion this time, but I like Too Faced Shadow Insurance just as well, so if that's what you have, use it! Using my orbital bone as a guide, I then used a synthetic concealer brush to fill in the entire ocular cavity with black. I ended up using the same MAC Blackground Paint Pot that I'd used on my nose, so in the end I may not have needed a primer, but better to be safe than sorry! When I finished filling in my eyes, I topped of the black area with a dusting of Sugarpill Chromalust pigment in Stella (an awesome black base with vibrant rainbow sparkles!)to add a bit of interest.

To do the "petals" around the eyes, first I took a liner and lightly traced the area- the same Ben Nye Plum for the red petals, and Urban Decay Ransom for the purple. I did the smaller, red petals first, basically placing one above and one below my pupil, and then one at the outer corner of my eye. Then I went back with the purple and drew larger petals in the gaps. For the red petals, I used Sugarpill Love+ to fill in, on the purple petals I first filled in with Sugarpill Poison Plum and then made a center highlight and blended out to the edges of the petal with Sugarpill Dollipop.

At this point, I was running out of time and had a very impatient toddler (and perhaps a more impatient toddler's Daddy!) waiting, so I grabbed a bit of Sugarpill Darling Chromalust and mixed in a couple drops of MAC water-based mixing medium to make a paste. Using a fine lining brush (Grumbacher #1 Goldenedge Round from the craft store) I pained a freehand vine on the center of my forehead, as well as spikes coming out from between the petals around my eyes. I also used the same brush to paint a few hash marks around the inside corner of the eye, and after washing it, painted small hearts at the end of the petal spikes using Makeup For Ever Aqua Cream #7 Fuchsia. My final touch was a flower at the center of my head- the orange center is done with Sugarpill Flamepoint (which darkened a bit due to the moisture from the cream makeup) and the yellow petals are OCC Liptar in Traffic with Sugarpill Buttercupcake on top. A spritz of Mehron Barrier Spray kept the entire thing on through the night; this photo was actually taken after trick-or-treating!

Hope you all had a wonderful holiday, and even if you're not Mexican or Catholic (I'm neither myself) use this day to remember with fondness the people in your lives who are no longer with you in body, and take comfort in knowing that as long as you honor them in memory, they'll always live on in spirit.

Friday, May 7, 2010

D-Eye-Y:
The Caged Bird Sings, but the Magpie ROCKS!!!


Just in time for the weekend! Here's a drop dead stunning look that packs a major punch, but is deceptively simple. It only takes 2 shadows and 5 minutes, so it's perfect for those nights when you're running straight from work to dinner, a party, the club, Iron Man 2, whatever...

One of the great things about this look is how easily it adapts- you could essentially choose any medium depth shade for the lid- though I like the pop that a metallic gives. For the outer V, crease and inner corner, I chose a gorgeous, multifaceted blue shade (Sugarpill's Magpie Chromalust) but you could easily use a plain black (yawn!), an espresso brown, or even a deep plum. Your imagination is the only limit.

  • As always, prime your lids.
  • Using a small, dense shadow brush (or even your ring finger!) pat on a vibrant gold shadow all over the lid, up to the crease.
  • Next, using a tapered crease brush apply a deep blue pigment to the brush and place it on the outer corner of your eye, working it into the nook under your brow bone in small circles. Keep the bristles of the brush firmly planted in the corner of your eye- at this point, you want to be moving the handle of the brush, but not really manipulating the bristles. You're simply wedging the color into the corner.
  • Work the brush up into the crease, right along the top edge of where the gold stops. Move in windshield wiper like, back-and-forth movements, and slowly work to bring the blue towards the inner corner. To make sure you're blending as you go, move slowly, each time going a centimeter or so further in, until you've reached about the halfway point of your eye. You can repeat this step if you find you like the crease darker.
  • Next, take a small smudger brush, and apply some of the same deep blue pigment to the very inner corner of the eye. Use what's left on the brush to smudge some of the blue into the gold along it's upper edge, again working in a windshield wiper motion, until you've almost met up with the line of blue that you created from the outside corner.
  • To finish, use a matte skin-tone shade on a fluffy blending brush, and work it back and forth over the top edge of the deep blue.
  • Apply liner. I used my Magpie pigment wet and smudged just a little along the outside half of both my top and bottom lash lines.
  • Add mascara (or if you have time to spare, so falsies) and you're ready to party!

Product List:

Primer: Too Faced Shadow Insurance (or Urban Decay Primer Potion- I use them interchangeably.)
Lid: Chromalust Loose Eyeshadow in Goldilux (all shadows used are from Sugarpill Cosmetics)
Outer and Inner Corners, Crease and Top and Bottom Lash Lines: ChromaLust Loose Eyeshadow in Magpie
Mascara: Diorshow in Nior/Black
Brows: Automatic Brow Pencil Duo in Soft Brown (Estee Lauder)
Natural Brow Powder in Light Brown (Merle Norman)

Brushes:

MAC 239 (small dense eyeshadow)
MAC 226 (tapered crease brush. This one was limited edition, if you don't have anything similar, you could use a fluffier domed brush like MAC's 222 or a pencil brush like MAC's 219)
MAC 222 (fluffy, domed blending)
Lancome #10 (small smudger)

Tuesday, April 13, 2010

D-Eye-Y:
Under the Sea

This is the color combo that restored my faith in blue eyeshadow! A childhood in the 80s instilled in me a healthy fear of the baby blue monster, and when I began my career as a makeup artist in the mid-90s, I stayed as far away from the stuff as I could. Frankly, it was too soon- we needed time to heal. One day, the brand I worked for (ironically nicknamed Mama Blue) launched a brilliant matte Crayola blue eyeshadow that screamed "Try me!" and my world was turned on its head. OK, maybe that's an exaggeration, but since my line wasn't exactly known for their vivid shades, anything beyond the normal subdued spectrum was game for me!

It's been several years since I took the leap into the big blue with that vivid Crayola color, and I'm happy to say, my forays into the wild blue yonder gave me the tools to cure many people of their abhorrence of the azure, terror of teal...condemnation of cyan. OK I'm done.

Needless to say, when Sugarpill Cosmetics generously sent me a package of their goodies to try, I was thrilled to see that a few of the shades in the assortment were perfect for one of my favorite looks. This look has always reminded me of the ocean; bright blue where the sun hits the shoals, cool kelpey green in the depths, with mysterious glimpses of what I like to imagine could be the flash of mermaid fins (so much nicer to me than slimy, scaly fishes!)

The great thing about this look is that it's super fast to do- the analogous colors gradate easily from one into another, so you don't have to spend a ton of time blending.
  • After priming the entire lid, apply a matte bright yellow to the inner 1/3 of the lower eyelid.
  • Using a small, dense brush, apply a vibrant kelly green to the remaining portion of the lid, leaving just a bit of bare skin at the outer corner.
  • Use the same brush (after wiping it clean) and lightly blend the horizontal line between the yellow and green, being careful to leave a bit of the unadulterated yellow at the inner corner of the eye.
  • Next, take a vibrant mid-tone blue and apply it to the outer 1/3 of the eyelid.
  • Using a fluffy shading brush loaded with a bit more of the blue, extend the color up into the outer V area, blending it lightly with the green in the middle.
How far up you choose to bring your color will vary based on your eye shape and comfort level. Since my eyelid is quite small and I have a good amount of space from crease to brow, I like to extend my color slightly above my crease. If you have more lid space, or you're a bit color shy, you may choose to keep your shadow mostly on the lid, blending just slightly into the crease for dimension.
  • To soften the top edge, use a skin-toned powder on a clean fluffy shading brush and swipe left to right over the edge where the colors meet bare skin.
  • Apply a deep blue liner to the outer half of both the top and bottom lash lines.
  • Using a tiny smudger brush, dust a shimmering gold on to the tear duct and inner half of the lower lash line.
  • With the same brush, go back to the inner corner and extend the gold from the tear duct up onto the lid, following the line where you blended the green into the yellow.
I have to interject here- I generally try keep shade descriptions in my tutorials kind of ambiguous (it's so not necessary to rush out and buy the exact one I have- use what you own!) but I have to gush a bit about Sugarpill's Goldilux. I am so glad Amy sent me this shade! I have tons of golds; I'll admit, I never would have purchased this one on my own. For the most part, I find most golds eminently dupeable. Sure, some are more antique gold, some closer to bronze, but essentially the finish is the same and I find myself grabbing for whichever is nearest. Goldilux, however, is different from any other gold shadow or pigment that I own. It's an intense, metallic true gold, which is nice on its own, but what sets it apart is its twinkle. Goldilux's shimmer particle size is so fine that it blends in perfectly with the pigment, resulting in maximum wattage without visible chunks of glitter. It's just plain gorgeous. Now, resume tutorial:
  • Again, using a small smudger, blend the vivid blue shadow over the liner along the bottom lash line. Moving inward, lightly blend the blue into the gold at about midpoint.
  • Swipe on a quick coat of black mascara on the lashes, or falsies if you're feeling fancy, and you're ready to go!

Product List:

Base: Too Faced Shadow Insurance (or Urban Decay Primer Potion- I use them interchangeably.)
Inner Lid: Buttercupcake Pressed Eyeshadow (all shadows used are from Sugarpill Cosmetics)
Middle & Outer Lid: Midori Pressed Eyeshadow
Outer Lid, Outer V & Lower Lash Line (Outer): Afterparty Pressed Eyeshadow
Lower Lash Line (Inner), Tear Duct, and Inner Corner: ChromaLust Loose Eyeshadow in Goldilux
Top Lash Line and Waterline: Blue Jay Duo Eye Pencil (Vincent Longo)
Mascara: Diorshow in Nior/Black
Brows: Automatic Brow Pencil Duo in Soft Brown (Estee Lauder)
Natural Brow Powder in Light Brown (Merle Norman)

Brushes:

MAC 239 (small dense eyeshadow)
MAC 222 (fluffy, domed shader)
Lancome #10 (small smudger)

*Pro Tip: I actually used my finger for this part! Shocking but true; sometimes you can't beat a clean digit for dense application. While it's generally true that brushes give you more control over the placement of your color, using your fingers helps you become more comfortable with your bone structure, which helps you learn where to place color.

Wednesday, December 9, 2009

Eye Brow 101: The Ideal Shape

The perfect brow is a bit like the comfortable stiletto. It's rumoured to exist, but you could easily spend your entire life trying to find it with little success.

Brows are probably the most important overlooked feature on the face. They frame the eye; providing structure and balance. The right brow shape can not only make they eyes seem larger, and more lifted, it can actually change the appearance of the face itself. A round brow can soften an angular face. Flat, shorter brows can help those with long faces look softer and rounder. Though it's important to work with the shape you were given, there are a few simple guidelines that can help you make the most of what you've got.

The easiest way to figure out the proportions of your brows is to grab a pencil or makeup brush and use it as a visual guide. The following picture illustrates the "ideal" brow shape. Universally flattering, it can be worn by a variety of face shapes to create a cleaner, more groomed, brighter eye. Here's how to get them, in three simple steps:

Step One
The Inner Corner- this is where your brow should begin. Using your pencil, lay it against the nostril on the same side as the eye you're measuring. The pencil should go straight up, intersect the inner corner of your eye, and go up onto your brow. The point at which the pencil lies on your brow is where your eye brow should begin. If you're coming up short, consider filling in a bit with a brow pencil. If you're coming in any closer toward the other brow, grab your tweezers and pull the errant hairs one by one until you're at your desired point.

Step Two
The High Point of the arch. Keeping your pencil against your nostril as before, angle it so that the pencil goes across your eye to the outside of your pupil, and over on to the brow. The part where the pencil intersects your brow should be the highest point of your brow. The area between the inner corner (Step 1) and the highpoint of the arch (Step 2) should all be pretty much the same thickness, it is at the high point that the brow should begin to slope down and slightly taper off.

Step Three
The Outer Corner- again, start with the pencil along your nostril. Angle it toward your temple so that the pencil lines up with the outer corner of your eye and reaches outward. The point where the pencil touches your brow is where it should end. As you can see, the model in the picture falls a bit short, as do I. I like to use an angled brush and a brow powder to extend the line of my brow a bit.

So, there you have it. In parting, there is one thing I feel like I need to mention. I poured through several hundred stock images searching for a model with perfect brows to use for the diagram above, and what I found was that NO ONE, including the model I used, has perfect brows. Technically, this model's brows are too close together, and not long enough. Does that mean they're not beautiful, or that she looks hopelessly out-of-proportion? Of course not. Remember- guidelines are just that, follow them as closely as your shape allows, and take the tweezing slow!

Wednesday, December 2, 2009

Quick Tip:
Don't Pluck Amok!

To create (and maintain) the perfect brow shape, try penciling in your preferred shape before you tweeze. If you're uncertain about the shape, stop by a cosmetic counter and ask an associate to pencil them in for you. Also, stay tuned for my next post: a quick primer on brow shaping (complete with an easy to follow diagram!)

It's a good idea to make sure the rest of your eye is clean, you don't want to introduce any ickyness when you tweeze. Stand back from the mirror and draw in your brows quite heavily- since this is an aid to shaping and not for wearing outside of the house, you'll want to be able to see where you put the pencil. When you close in on your mirror, you'll be able to see exactly where you need to groom- only pull hairs that are NOT covered by your pencil.

If your brows have never been shaped, or are very grown out, follow the same technique as above, but use a white or nude pencil to draw over the hairs you'll pull. This will give you a more clear idea of what the shape will look like, and will keep you from over tweezing!

Monday, November 9, 2009

Halloween Looks:
Lucent Rainbows & Pink Calamari!


As I promised on Twitter earlier this week, here's a peek of a couple Halloween looks I created this year, one on myself and one for Stacey Vest, wig guru and the talent behind Sweet Hayseed's Wearable Wonders.

This was the first year we took my daughter Trick-or-Treating (she was Abby Cadabby, if anyone is curious!) so I had a busy day on the 31st- this culminated in me having to slap on my own makeup as fast as I could, as my fiance, mother and daughter waited anxiously. I wouldn't say this is a great representation of my work- I spend a ton more time on my clients. Still, it was fun, so here it is! You'll also have to excuse me if my photo quality isn't great- I think you'll still get the gist!


This first one is a close up of me wearing the Shu Uemura Lucent Rainbow Eyelashes that inspired the entire look. Honestly, I wanted these from the moment I saw them. When Nordstrom opened here last month and I realized they had a Shu Lash Bar, I had to get them; Halloween was really a convenient justification!

Though the picture is not in the sharpest focus, hopefully you can also see my Geo circle lenses- cute and freaky at the same time! I got them relatively last minute from CandyOps for only $10! They're just cosmetic- no script, but for that price, they could have been disposable for all I care!


Unfortunately, this was the best picture we were able to get of the actual eye makeup, but who are we kidding, the lashes were the star anyway! Still, it was a pretty rainbow look, and something I might like to re-create some day.

I created the entire look with my Sleek I-Divine Acid Palette, which is (as it promises) acid bright! It's so bright, in fact, that when I tried to photograph the palette itself in sunlight several of the neon shades (which are matte) actually glared back at the camera like a bicycle reflector!

To get this look, I started with yellow on the inner corner (I know you can't really see it, but trust me, it's there!) I packed the palette's neon orange shade onto the outer 2/3 of the lid, then added the hot pink in the outer corner and crease. To add a bit more dimension, I worked just a bit of a slightly deeper magenta into the outer V and blended it into the crease. On the bottom lash line, which is more visible in the other photos, I rimmed with purple, blue and neon green from the outer to the inner corner.

In case you're wondering, right now Sleek Makeup is only available overseas, something the company promises it's working hard to remedy. The Acid palette itself was actually a limited edition; I had to hunt down mine down on the UK EBay, but it was totally worth it. Aside from great, original colors, Sleek Makeup is ridiculously inexpensive- the palette itself retails for £4.99, which is a little over $8.00. Combine my purchase price with overseas shipping and it was about the same price you'd pay for a single MAC shadow!


This one is the lovely Miss Stacey, wearing the look she coined Calamari. Up until the day before Halloween, I was working under the assumption that Stacey was going to dress as Little Red Riding Hood. In all fairness, she had told me that something snake-like was also a possibility- knowing how kooky Stacey is, I should have known the look would morph into this!

After prepping Stacey's skin with primer, foundation and concealer, I created a mottled pattern with Kryolan's UV Purple Aquacolor. Using a piece of netting from a pair of crocheted stockings as a stencil, I sponged the pattern onto Stacey's forehead and under her cheekbones. I also used the UV Purple to fill in her brows and cut her crease. Though the picture cuts it off, the cut crease wings out and up to meet her extended brow line, which reminded me of tentacles. Keep in mind, the UV Aquacolors all glow under black-light, an effect that I hope Stacey was able to make use of!

After blending the crease upward with the purple and white shades from my Sleek Acid palette, I used the neon pink shade from the palette on Stacey's lid, forehead and cheeks. I topped of her lids with a coat of Mehron Paradise Glitter in Electric Magenta. Truth be told, I wasn't thrilled with this product- it was a plastic-like material with almost no reflective quality; it looked more like pink sanding sugar (the kind you decorate cookies with) than glitter. It's times like these I most wish we had a MAC Pro store nearby, but alas...

To finish things off, I lined Stacey's lips with NYX lip liner in Prune, filling in all but the center of her lips. I topped this off with an bright coat of true blue-based fuchsia lipstick.

As a finishing touch, I wanted to add a bit of sheen to mimic the opalescent glow that you can see on the skin of many underwater creatures. I used TKB's Hilight Violet on the center of the upper portion of Stacey's forehead. I also mixed a bit of the pigment into Obsessive Compulsive Cosmetics' Clear Lip Tar, which made an incredible iridescent gloss. A pair o' big pink lashes and a quick snap with my iPhone camera later and Stacey was out the door.

Though I wasn't able to see Stacey's full calamari getup in person, she did have some images taken for promotional use. Hopefully, I'll be able to get more shots, but I couldn't resist giving you guys a peek of the look complete with one of Sweet Hayseed's custom wigs!

So, that was my Halloween. In addition to my makeup and blue wig, I wore a HUGE rainbow tutu, made by the multi-talented Ms. Vest. Though the extent of my festivities was Trick-or-Treating with Rorschach and a 21 month old fairy-in-training, it was one of the best Halloweens in memory (and not just because we got 3 full sized Reese's Cups from one house!) So, any ideas for next year?

Wednesday, October 7, 2009

Quick Tip: Vampire Chic on the Cheap

Believe it or not, there was a time, not so long ago, when goth was actually a SUBculture and vampire chic was the farthest thing from mainstream. This fall's makeup collections from Nars to Chanel to MAC are showcasing inky lips and raven eyes, making us beauty junkies feel as if we've been missing something by not having a black tube of lipstick in our kits. I'll admit, I was tempted by the tarry tubes- not just black, but deep plums, rich sooty reds, even night-sky eggplant shades. These shades are not daily-wear by any means, but they do impart a certain opulence that you won't see with fall's usual terracotta and brick shades.

Still, when it came down to it, I just wasn't willing to plunk down the cold hard cash for something I'm unlikely to wear outside of the month of October. Especially when I already have the means to create an arsenal of shades, including the rich black lip I've been craving ever since I saw the promo images for MAC's Style Black collection. The secret? So do you. Basic, every day eyeliner pencil.

This is one of the most basic tricks I learned, way back in junior high when I decided I needed blue lipstick to match my outfit. Experimenting in my bathroom before school one day, I learned my first lesson in makeup artistry: makeup is multi-purpose. Just because it's called "eyeliner" doesn't mean you can't use it else where. So I did.

Ergo, all you need really need for this season's perfect black lip is a black pencil liner and something to impart a bit of moisture. Simply line your lip line with a black pencil, then fill in the entire portion of your lip. For a glossy look, top with your favorite clear gloss or balm. If you're after a more matte look, you could, of course, leave the liner as is without a topcoat but since liner alone can tend to feel a bit dry on the lips, I'd suggest topping it with a wax based lip moisturizer (like good ol' ChapStick). If you're happy with this more satiny finish, you're done. If you're craving a truly matte finish, pat a bit of black powder eye shadow over your lips.

With two minor revisions, you can use this same technique to get richer blackened red or plum shades. Line lips with a black liner like before, but this time only fill in your lips about 3/4 full, leaving just the very center blank. Layer a red, plum, even pink shade over and use a lip brush (or your pinky finger!) to blend the edges gently. The lack of liner in the the center of your lip will give an automatic highlight, making your lips look fuller despite the dark shade!

Take this lesson for what it is- an invitation to experiment with your makeup in a no-holds-barred manner. Use blush on your eyes, eye shadow as high lighter, anything goes. Sure, sometimes you'll end up looking ridiculous, but you may just stumble upon next season's hot trend.

*Keep in mind, certain color additives are not approved for all areas of the face. If you're sensitive, always test products in an inconspicuous place. Also keep in mind that the eye area is particularly prone to sensitivity and infection- it is imperative that you sanitize any product not meant for the area before you apply to lessen the chance of cross contamination.

Friday, September 25, 2009

Foundation 101:
Finding Your Best Shade

I'm decidedly a cosmo-anarchist. In my makeup land, there are no rules, no laws- anything goes. However, if there were one, it would have something to do with the abolition of what we makeup artists know as "lines of demarcation." We've all seen them, the horrid mask lines on the jaw that appear when someone has applied a shade of foundation that is appallingly wrong. Lines that leave you asking yourself: "Can't she see it? Who does she think she's fooling?" As obvious as this condition is to the rest of us, it is rarely the choice of the afflicted. Choosing the correct foundation shade can be a daunting task; with an ever widening span of shades and tones available, how's a girl to tell what's the best for her? Believe it or not, a little 4th grade math can help. Confused? Read on.

The first step is to decide what depth your skin is: are you light, medium or dark? This is most likely something you're already aware of. If you're lighter or darker than most, then it's probably pretty obvious where you'll fall. If you're not sure, then you're most likely in the medium range. For now, don't worry about your undertones, just the depth of your skin.

When you get to the store, look at the entire range of foundation you're considering, and divide it into 3 equal parts- for light, medium, dark. If a line has 15 shades, you'll end up with 5 light, 5 medium and 5 dark shades. Realistically, most lines have more shades that will fall into the medium category than the light and deep, so if you can't divide the range into equal parts, lump the extras into this middle category. Ergo: If a line has 17 shades, consider 5 light, 5 dark and the other 7 medium.

Next it's swatch time. You're always going to swatch 3 shades to begin with. Say it with me- 3 shades! Even if you're positive where you fit in the spectrum, testing a few shades will ensure that you get the best match not only to the depth, but also the tone of your skin. So, going back to our example- say you've decided you're light. That means one of the first five shades should be your match. How do you decide which one without swatching all five? Simple- just decide where you fall in the spectrum of "light"; are you the lightest of the light, or more light/medium?If you decide you're definitely among the lightest, then the first 3 shades in your light group will be your test shades. If you're fair, but not super pale, go with the last 3 in that group. The same goes for medium and deep tones, just evaluate where you fall in that individual category.

When you're ready to swatch, make sure you're doing it on bare skin along your jaw line, since the goal is finding a match that blends seamlessly from your face to your neck. Testing on the back of your hand or the inside of your wrist won't cut it, the shades of skin from body part to body part can vary widely. Take a clean Q-tip for each test, and draw a vertical line with the makeup along your jaw, spacing the shades about an inch apart.

Chances are, at least one of the 3 you've tested will jump right out and scream WRONG!!! If the shade looks chalky or dry, it's probably too light. If the shade looks orange or muddy, it may be too dark or the wrong undertone for your skin. Obviously, this one is out of the running. Keep in mind, any foundation striped on is probably going to be visible, so you may want to lightly smudge the bottom half of each line to see how the shades blend. If you're still not sure, step away from the mirror, squint your eyes, and see which shade disappears.

It's not uncommon to find you may be able to wear more than one shade, especially with sheer formulas. Of course, some skin tones are harder to match than others, and some lines may not work for some people, so if you're having a hard time finding a match in one line, try another formula, or another brand all together. Luckily, most major brands have associates that are trained to help you find your best shade. Take advantage of color matching services when they're offered, and if you're unsure, there's nothing wrong with asking for a sample to take home (as long as your planning to buy when you find the right shade!)

Hopefully this makes sense to you all, when I was a manager, this was the technique that always seemed to click with my associates; I think it translates just as well to the home shopper. Nest time you're out, give it a try & let me know how it worked for you!

Saturday, September 12, 2009

Quick Tip: Choosing the Right Illuminator

If the impending fall/winter season has you scrambling to pick up something to restore your skin's glow, here's something to bear in mind. Despite being touted as skin tone perfectors, many iridescent illuminators and skin brighteners can actually call attention to the very thing you're trying to correct.

If redness in the skin is a concern for you, whether it's something chronic like rosacea or just a few inflamed pimples, be aware that many illuminators (like MAC Strobe Cream, Estee Lauder Spotlight, or Benefit High Beam) have pearly particles that will actually emphasize red or pink tones in the skin. While they might be a great choice for brightening some skin tones, putting this type of opalescent shade on skin that it already plagued with redness is likely to bring about a glow that's more stoplight than spotlight. Many moisturizers that are billed as "luminous" also have this added pigment. While this red cast is quite apparent in some products, it's much more subtle in others. If you're not sure, put a good sized dab in the palm of you hands and rub it it. The particles are likely to settle into the fine lines and become more obvious.

A better bet for ruddy skin is a white or champagne shade, like Benefit Moon Beam or Illamasqua Illuminator in Odyssey. For an all-over glow, mix a pea sized drop into your foundation or moisturizer, or just pat it on key areas. Keep in mind, if you wear foundation, choosing a dewier formula (rather than a matte or satin finish) may eliminate your need for a separate illuminator all together. I love Face Atelier Ultra Foundation for it's fresh, natural look on the skin- it offers good coverage and allows my skin to retain that "just applied moisturizer" look without feeling heavy or greasy.

Monday, June 29, 2009

120 Palette Inspiration:
Taco Bell at 3AM

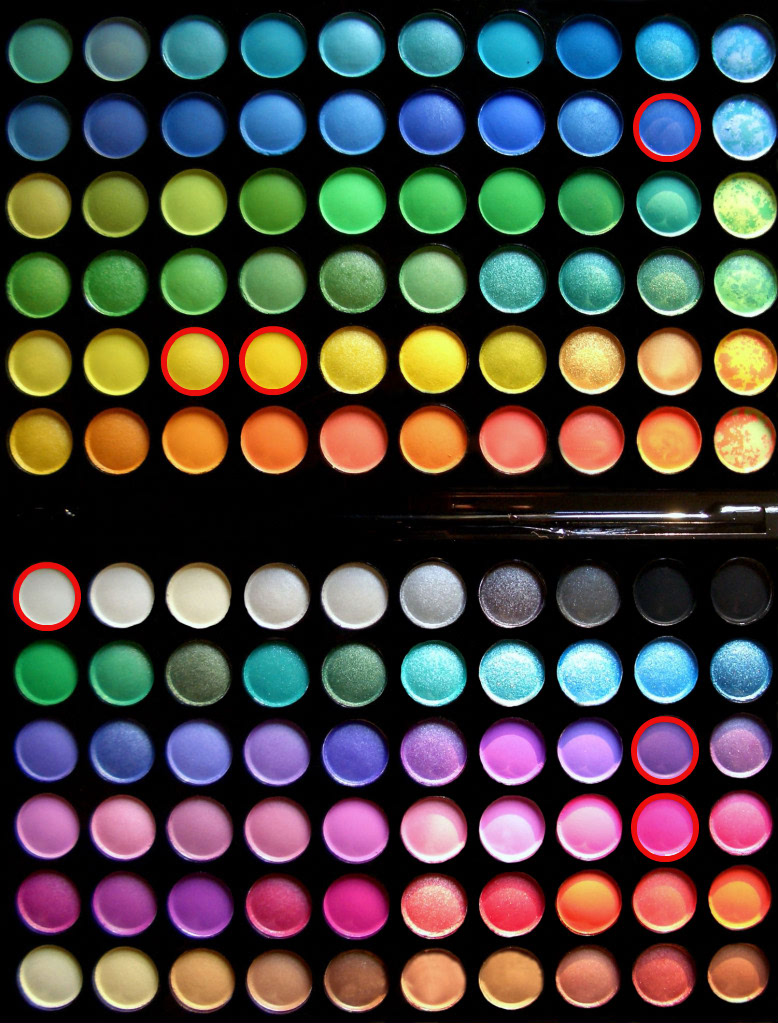
A few weeks ago, I finally gave into my curiosity and purchased the 120 palette on Ebay. I figured, for $15 what did I have to lose? Friday, my palette arrived from Hong Kong and despite seeing warning after warning that they usually come with at least a few broken pans, mine had not a single chip. I couldn't wait to play, but with so many colors, where does one begin? So I asked my tweeps for some inspiration. My pseudo brother-in-law replied thusly:

"Makeup Inspiration Suggestion: taco bell at 3AM after a drunken rager of a party. AND GO!"

So, for those of you that don't follow me on twitter, here it is:


Though this is obviously not a look you're going to wear to the grocery store, without the bled-out mascara, it's actually quite wearable. In case you didn't pick up on it, the colors on my lid- yellow, fuchsia and purplish-blue are the colors of Taco Bell's logo. The bleeding mascara, well, that's the 3AM after a drunken rager part...

I enjoyed playing with the palette; give me a few weeks to play and evaluate and I promise a more comprehensive review. I should mention, the photos are not the greatest (it was getting ready to storm outside, so I just couldn't find good light!) The colors look a bit washed out- they were much brighter in person.

I primed my lid and applied a white cream shadow to the inner third of my eye, just up to the crease. Then, using a small, dense brush I applied a vivid, matte yellow to my lid over the white, again, just to the inner third of the eye. Using my pencil brush, I layered a lighter, slightly shimmery yellow over the matte shade in the very inner corner of my eye, extending it down onto my tear duct and slightly under the inner corner of my lower lash line.

Next I took a bright, matte fuchsia and patted it on the outer two-thirds of my eye, being careful to just blend the edge of the yellow with the fuchsia. Switching to a domed shader brush, I took a deep purple and applied it to my crease, extending the line into a soft V shape to connect it to my upper lash line. Using a pencil brush, I added in a bit of cobalt blue over the purple and slightly into the fuchsia, just to blend the colors.

After cleaning off my domed shader, I applied a matte white to highlight my brow bone and fade out the purple. I added a bit more purple along my upper and lower lashes, stopping short where the yellow was applied (yellow+purple= mud).

If you've never purposely smudged your mascara, here's how I did it: I applied regular black mascara to my bottom lashes only. Then I put a drop of Visine in each eye, and blinked my eyes shut rather tightly. This gives a bit of smudge to start with, for added drama I took a fan brush and lightly dragged it through the wet mascara. Now that you know how to do this, promise you'll only use your knowledge for good, OK?

Product List:

Eyes
Base: Urban Decay Primer Potion
Eye Lids: 120 Palette (the one with the row of marbled shades)
For a view of the 120 palette with the specific shades I used outlined, CLICK HERE.
Brows: Automatic Brow Pencil Duo in Soft Brown (Estee Lauder)
Mascara: L'Oreal Voluminous in Carbon Black

Brushes
MAC 239 (small dense eyeshadow)
MAC 219 (pencil brush)
MAC 222 (fluffy, domed shader)
Fan brush (mine is a discontinued Estee Lauder brush)

Saturday, June 6, 2009

Lime Crime Look:
The Phoenix

This incendiary look is an update of an old signature look of mine that came to be known as fire eyes. When I first created this look, you simply couldn't find red eyeshadow; I used blush and lip liner to create the flame's vivid red. Now, in honor of Xenia and the launch of her fantastical Lime Crime Makeup, I've been inspired to revive fire eyes. From the ashes of old arose- the Phoenix!

I created this look with eye colors exclusively from Lime Crime Makeup, using only 2 shadows and a glitter for the entire look! Read on for all of the details, and make sure to click here to read my complete review of Lime Crime Makeup.


As always, I started by priming my lids from the upper lash line up to the eye brows. Using a small eyeshadow brush, I applied bright yellow Circus Girl to my lid, starting at the inner corner of my eyes and extending it just up to (but not in) the crease, leaving the outer third of my lid blank. I was very careful not to take the yellow into the crease or outer "V" of the eye, since I wanted the red to be as pure as possible.

Placing my pencil brush in the crease at the outer corner of my eye, I worked Siren (a warm, satiny red) along the crease, extending it just past the center of my lid, blending it slightly into the yellow shadow. Switching to a fluffy, domed shading brush, I used the brush clean first to blend the red crease shade lightly into the yellow, being careful to leave the inner corner pure yellow and the outer corner pure red. Then I applied the smallest bit of red pigment to the brush and applied it lightly it to the center of the lid and out. As you can see in the closeup, the result was a gorgeous coppery orange tone.

As an update to my old look, I added a bold blue "flame" along my lower lash line with sapphire blue glitter. I moistened a flat, angled eyeliner brush with a mixture of glycerin and water, dipped it into the glitter and placed the sparkles just underneath my bottom lashes, thinning and winging the line up slightly at the outside corners. Then, I used a moist smudger brush to apply a bit more glitter to my tear duct, extending it up slightly onto the inner corner of my lids. I applied a deep blue liner to my waterline, and finished the look with black mascara, false half-lashes, and a thin line of black gel liner to disguise the lash band.

Since this look is more editorial than daily wear, I chose to match the boldness of my eyes with a bold red lip. I applied a cherry red shade to my lips, patting a bit of Circus Girl pigment on top before applying clear gloss. When I ventured out on a shopping trip later in the day, I did switch to a more toned down lip, filling my lips with a nude liner before topping it with a bit of Circus Girl mixed into clear gloss.

Product List:

Eyes
Base: Urban Decay Primer Potion
Inner Lid: Circus Girl Magic Dust (Lime Crime Makeup)
Outer Lid & Crease: Siren Magic Dust (Lime Crime Makeup)
Lower Lash Line, Tear Duct, and Inner Corner: Unicorn Glitter (Lime Crime Makeup)
Top Lash Line: Blacktrack Fluidline (MAC)
Waterline: Blue Jay Duo Eye Pencil (Vincent Longo)
Mascara: Chanel Inimitable in Black
Brows: Automatic Brow Pencil Duo in Soft Brown (Estee Lauder)
Eyebrow Mascara in Auburn (Bourjois)
Lashes: Andrea Accents #305 in Black

Cheeks
Fusion Soft Lights in Dusk (Smashbox)

Lips
Pro Longwear Lipcolor in Lasting Lust (MAC)
Circus Girl Magic Dust (Lime Crime Makeup)


Brushes
MAC 239 (small dense eyeshadow)
MAC 219 (pencil brush)
MAC 222 (fluffy, domed shader)
Estee Lauder 7E (flat, angled eyeliner)
Lancome #10 (small smudger)

Wednesday, May 27, 2009

Bright Eyes in a Jiffy

Here's a quick, easy way to brighten your eyes- it's great for those days when you hit the snooze button one too many times, but don't want to show up to work still looking half asleep. All you need is white eyeliner, a shimmery (not sparkly) white shadow, and your favorite mascara.

Start by putting a drop of Visine in each eye. This is a popular photographer's trick- in addition to decreasing redness, the extra moisture from the drops will make them glisten and appear instantly brighter.

Next, use your white pencil to line the water line. The color will fade a bit after a few blinks, so don't worry if the look is a bit 60's mod at first. Now, take your liner and dab a bit of white onto the skin right around the tear duct- closest to the inner corner of your eye. I like to use a smudger brush to blend out the pencil line just a bit. Then, using the same brush, add a bit of shimmery white shadow around the tear duct, extending it up onto the very inner corner of the lid itself. Use the same white shimmer to highlight beneath your eyebrows- start under the high point of your arch and blend outward to where your eyebrow ends.

This trick works great as is, but you can easily work it into any eye look; just do your lid and crease as you normally would, adding the white liner and shadow as a finishing touch. Add a coat of your favorite mascara and you're ready to go!

Friday, May 22, 2009

Summerize your Winter Lipstick

Yearning for a fresh summer lip shade but can't bear the thought of banishing your winter favorite? Though I'm a big believer in the "no rules" rule, it can feel a bit silly to sport deep red or wine lips on a hot summer day. Tearing yourself away from that deep dark go-to can be tough, especially if you have a hard time finding shades you like in the first place. Luckily, just a couple simple tricks can easily turn your winter stand-by into your favorite "new" summer sizzler!

For the quickest, easiest way to use a dark shade in the summer, think stain. Simply use your finger tip to pick up a small amount of color from the tube. Use your finger to apply a dab of lipstick to each side of your Cupid's bow, then smudge the color into your lips. Don't automatically apply more product to your bottom lip, simply press your lips together to transfer the lipstick and blend a bit with your finger until the color is even. The idea is to look as if you've just eaten a Popsicle or a handful of berries- the color should be worked into your lips until it doesn't feel as if there's anything on at all. This works best with smooth lips, since the color will grab onto any dry or flaky areas and look uneven. (For an easy way to smooth lips, check out my post from December '08).

Another great way to transform deep shades is to sheer them out. All you have to do is apply a clear balm to the lips before you apply your lip color. The balm creates a barrier that prohibits the lipstick from adhering to your lips completely, so you end up with just a tint of your normal color. Almost any clear lip moisturizer will work from ChapStick to Lip Smacker. I like Victoria's Secret's Beauty Rush Soothing Lip Balm- it has a nice shine, contains Vitamin E and Aloe to soothe and moisturize, and never feels sticky. After you've applied your balm, apply your lipstick starting with your top lip, rubbing lips together to spread color as you did for the stained look. This is a great way to get a "juicy" look for your lips: winter wines become summer berries, scarlet reds become fresh cherries.

Use these simple tricks as a starting point and start experimenting- you may even find a new favorite in a color you never thought you'd wear!

Monday, April 6, 2009

Ignore the Snow- It's Spring in Ohio!


For this look I combined lots of vibrant colors, but blended them well to keep the look soft. I'm loving the combination of pink and green this spring, it's very ethereal. I foiled Weeping Willow onto the lid, extending it just a bit above my crease. Applying the pigment wet not only brightens the green, but also brings out it's incredible violet iridescence.

Just above the green, I chiseled out my contour with Flamingo. Then I softened the line by blending upward with a lighter pink. Since green eye shadow doesn't do much to bring out my eye color, I added a bit of violet underneath to bring out the green in my eyes.

After blending under my arch with a matte white highlight shade, I decided to add a pop of Chrome Yellow to the inner brow bone to keep my eyes from looking too much like an Easter egg! Then, just for fun I glued some fabric flower petals to the outer corners and dusted them with a bit of the green and violet pigments to integrate them a bit!

Product List:

Eyes
Base: Urban Decay Primer Potion
Lid: Weeping Willow (Archetype Cosmetics)
Contour: Flamingo (Kryolan), Candy Cube (Estee Lauder- discontinued*)
Brow bone: Gesso, Chrome Yellow (both MAC)
Tear Duct: China White (Archetype Cosmetics)
Lower Lash line: Conjunction (Archetype Cosmetics)
Mascara: Chanel Inimitable in Black
Brows: Automatic Brow Pencil Duo in Soft Brown (Estee Lauder)
For the Petals: I hand cut 4 petals for each eye from small silk flowers (I bought mine at Michael's). Then I glued them on in 2 layers with spirit gum.

Cheeks

Flamingo (Kryolan eyeshadow)

Lips
Liner: Hottie Pink (Victoria's Secret)
Lipstick: Love (Estee Lauder- discontinued*), Vinyl Voltage (Estee Lauder- discontinued*)
Lip gloss: Beauty Rush Smoothie Moves (Victoria's Secret- discontinued*)

*Please feel free to leave comments or send me a message if you'd like suggestions on substitutes for discontinued colors.

Wednesday, March 25, 2009

How to Apply Believable Bronzer

If you can trust the runways, tan is in this season- then again, when is it not? According to Nars makeup artist Ayako, the look is “a gipsy girl who’s naturally weathered”. Though "naturally weathered" may not be the look most of us are going for, it's easy to take a cue from the runways and add a bit of color to your life!

I generally work with powder bronzers, which have a wider selection of colors and are easier to blend. If your skin tone is fair or light, choose a bronzer that has a slight rosy tone- this more closely mimics the glow of naturally tanned skin. For deeper and olive skin tones, stay with a bronzer that looks more brown than orange or peach, like the "natural" shade from Victoria's Secret (FYI, this is the same shade they used to call "Sunny Cheeks" in their old line). If your goal is a natural, believable tan you'll probably want to stay away from "illuminating" bronzers- they contain shimmer or sparkles that are a dead giveaway that your tan is faux.

Prep your skin as usual, applying any foundation or concealer before you bronze. Apply a dusting of loose powder before you apply the bronzer. Powders apply best over other powders, so this step will help ensure that you get smooth, streak free color from your bronzer.

Swirl your color onto a blush brush, then tap the brush lightly against the palm of your hand to knock off any excess color. Apply bronzer to the raised areas of your face; this is where the sun would naturally hit. Start with the apples of the cheeks, then bring the color up and over the bridge of your nose. Use what's left on the brush to lightly dust some color onto the center of your forehead, close to your hairline. Layer the color to get the depth you desire, then do a final blend by dusting a clean powder brush over the edges of your color.

As a finishing touch, add just a bit of bright pink blush to the apples of your cheeks; this mimics that little flush of pink that develops after a day in the sun.

Friday, March 20, 2009

Eye Shadow Theory 101: Complimenting Your Eye Color

One of the most common things I'm asked as a makeup artist is, "what color eyeshadow should I wear?"

If you're most interested in emphasizing your eye color, there are certain shades that are best. Colors look brighter when placed next to their opposite, or complementary, color. This means that for blue eyes, orange tones are best. Translate this into makeup shades and you get brown, gold and copper shades. For green eyes, red is the complimentary color. If red eye shadow isn't your idea of wearable, think of eye shadow colors that contain the most red: pinks, purples and wines. Brown eyes are a bit more complex, since brown is a mixture of many colors. The common complimentary color is blue, which can also include grays and silvers.

Want to know more about color theory?

Check out a color wheel or try this little experiment. Get 2 pieces of the same yellow paper, a piece of purple paper and a piece of orange paper. Hold the yellow and orange paper together in one hand and the yellow and purple together in the other. Which yellow looks brighter? Even though they're the same color, the yellow will appear more vivid next to purple, it's complement.

Of course, this is a basic way of choosing colors, and I'm definitely not saying that if you have blue eyes you have to wear brown eye shadow. While color theory can tell us what shades will bring out particular eye colors, gone are the days where you're assigned a "season" that predetermines what 6 colors you must wear for the rest of your life. Makeup should be fun and creative; a way for you to express yourself and your mood. I've never found a makeup "rule" that can't be broken.
Related Posts Plugin for WordPress, Blogger...